You can now use tokens from AWS Identity and Access Management (IAM) outbound federation to assume roles in other Amazon Web Services (AWS) partitions.
When your workloads run across AWS partitions such as Commercial, China, GovCloud (US), and European Sovereign Cloud, a workload in one partition might need to access resources or communicate with AWS services in another partition. AWS partitions are hard isolation boundaries with independent instances of AWS Identity and Access Management (IAM), so a credential issued in one partition isn’t valid in another. As a result, direct role assumption with sts:AssumeRole doesn’t work across partition boundaries and resource policies can’t reference principals that exist in another partition.
AWS IAM outbound identity federation already lets your workloads obtain a short-lived, AWS signed JSON Web Token (JWT) and use it to authenticate to external services. Today, we’re extending it with cross-partition support. Your workloads can now use that same mechanism to federate into another AWS partition. A workload in one partition obtains a short-lived JWT using sts:GetWebIdentityToken and exchanges it for temporary credentials in another partition using sts:AssumeRoleWithWebIdentity with no long-term credentials to store or rotate.
This post walks through configuring cross-partition identity federation using Amazon Simple Storage Service (Amazon S3) data access as an example, but the same steps apply to any cross-partition API call.
Important: If your workload requires cross-partition access, consult your compliance team to make sure that your implementation aligns with your regulatory or compliance obligations. A non-exhaustive list of examples are FedRAMP, ITAR, DoD CC SRG, GDPR, and others.
Why use IAM outbound identity federation for cross-partition access?
IAM outbound identity federation provides several benefits, including:
- Carry origin identity into authorization decisions – The destination trust policy can condition on the source identity’s context, its AWS account, organization ID (
org_id), source AWS Region, and principal, so you authorize based on who and where the request originated, not only that a token is valid. - Cross-partition audit trail – AWS CloudTrail events in the destination Region include the source principal Amazon Resource Name (ARN), source Region, and a token ID that correlates back to the source Region’s
GetWebIdentityTokenCloudTrail event. - Temporary credentials end to end – Your workload authenticates with a short-lived, signed JWT and receives temporary credentials, so every stage of cross-partition access uses credentials that expire automatically.
- Fully managed token infrastructure – AWS Security Token Service (AWS STS) issues, signs, and publishes verification keys for the JWTs. You don’t need to implement a public key infrastructure (PKI) or host your own OpenID Provider.
- IAM integration – You control access with the same IAM roles, trust policies, and permissions policies you already use. Destination accounts can condition on subject, audience, source Region, account, organization ID, and principal ID.
- Session revocation – You can revoke credentials that have already been issued. Scope the revocation by origin or apply a
denyon the destination role.
How cross-partition identity federation with IAM outbound identity federation works
Cross-partition identity federation works by obtaining a signed JWT from AWS STS in the source partition and exchanging that JWT for temporary credentials from AWS STS in the destination partition.
For example, a workload running in the AWS Govcloud (US) partition in the us-gov-west-1 Region can obtain a JWT and exchange it for temporary credentials valid in the AWS Commercial partition in the us-east-1 Region.
Architecture overview
The following diagram shows the elements and workflow used to support cross-partition access.
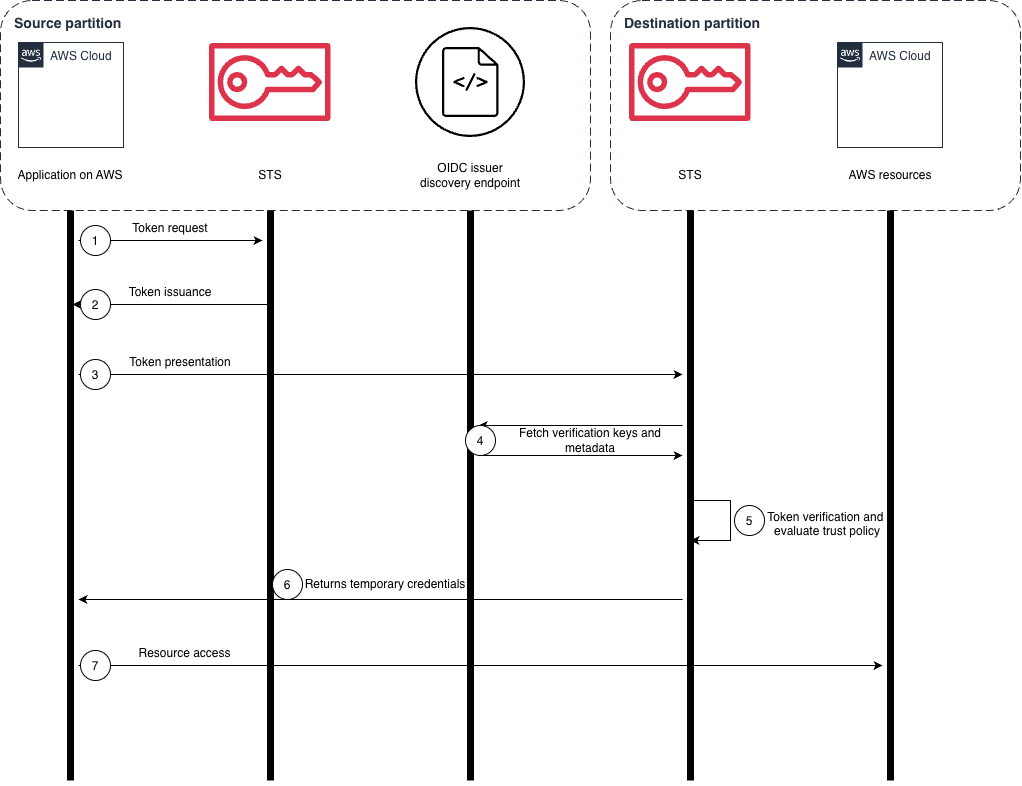
Figure 1: Cross-partition flow diagram
The cross-partition flow works as follows:
- Token request – Your workload, running in a Region from the source partition calls sts:GetWebIdentityToken API.
- Token issuance – AWS STS returns a short-lived, cryptographically signed JWT. The token contains claims that assert your workload’s AWS identity, including the account ID, the principal ARN, source Region, and more.
- Token presentation – Your workload calls sts:AssumeRoleWithWebIdentity on the AWS STS endpoint in a Region in the destination partition, passing the JWT as the web identity token and the ARN of the target role in the destination partition.
- Fetch verification keys and metadata – AWS STS in the destination partition retrieves the public verification key from your OpenID Connect (OIDC) Issuer URL’s JWKS endpoint.
- Validation: AWS STS in the destination partition verifies the token’s signature and evaluates the target role’s trust policy.
- Return temporary credentials: AWS STS in the destination partition returns temporary credentials scoped by the policies attached to the role.
- Cross-partition resource access – Your workload uses the temporary credentials to access resources in the destination partition, such as an S3 bucket.
Setting up cross-partition identity federation
In this walkthrough, we use the example of a workload running in the us-gov-west-1 Region that needs to access data in an S3 bucket in the us-east-1 Region.
Prerequisites
For this walkthrough, you need the following:
- Two AWS accounts: one in the source partition, AWS GovCloud (US), where the workload runs and one in the destination partition, AWS Commercial, that holds the data.
- In the source account: an IAM principal with permissions to enable outbound web identity federation (
iam:EnableOutboundWebIdentityFederation) and to callsts:GetWebIdentityTokento obtain a signed JWT representing its identity. - In the destination account: an IAM principal with permissions to register the source account’s issuer as an OIDC identity provider (
iam:CreateOpenIDConnectProvider) and create an IAM role whose trust policy allowssts:AssumeRoleWithWebIdentityfrom that provider, conditioned on the token’saudandsubclaims. - An S3 bucket in the destination account that holds the data you want to access from the source partition.
- A local installation of AWS Command Line Interface (AWS CLI)
So you can run and verify every step from your own command line, this walkthrough has you assume the workload role as the token-creating identity. In production, an Amazon Elastic Compute Cloud (Amazon EC2) instance, AWS Lambda function, or Amazon Elastic Kubernetes Service (AWS EKS) Pod runs as that role automatically through its instance profile or execution role with no assume-role step.
Step 0: Configure credentials for the GovCloud and Commercial AWS CLI profiles
This walkthrough runs commands in two partitions, so configure a named AWS CLI profile for each. For example, GovCloudCredentials for the source account and CommercialCredentials for the destination. Use the --profile parameter matching the partition where you run each command. In this walkthrough we configure our profiles in the ~/.aws/config file:
Step 1: Enable outbound identity federation on the source account
Enable outbound identity federation on your GovCloud account to generate a unique issuer URL that hosts the OIDC discovery endpoint needed for cross-partition trust. This needs to be performed once in the source account.
Using the AWS CLI:
- Ensure your IAM principal has permission to call
iam:EnableOutboundWebIdentityFederation. - Run the following command.
- Copy the issuer URL from the command output. For GovCloud, it looks like:
https://<unique-id>.tokens.sts.us-gov.api.aws
Note: IAM has a single endpoint per partition. The
--regionparameter simply targets that partition’s IAM. Enabling outbound web identity federation is an account-wide setting, so you only need to run this once.
Step 2: Allow your IAM principal to generate JWTs in the source partition
Create an IAM policy that grants permission to call the sts:GetWebIdentityToken API and attach it to the IAM principal that will generate tokens. This example uses an IAM role.
Using the AWS CLI:
- Ensure your IAM principal has permission to call
iam:CreateRoleandiam:PutRolePolicy. - Save the following trust policy to a file named
workload-trust-policy.json. This policy controls who can assume the workload role; the role’s ARN is what becomes the token’ssub. So that you can run the walkthrough from the AWS CLI, we set the principal to the identity behind your AWS CLI profile. In production, set it to the compute service that runs your workload, for example"Principal": { "Service": "ec2.amazonaws.com" }, which removes the need to assume the role manually. - Run the following command to create the workload role with the preceding trust policy:
- Save the following policy to a file named
get-web-identity-token-policy.json. This policy grants permission to callsts:GetWebIdentityToken, with conditions that restrict the token audience and limit the token lifetime to 300 seconds: - Run the following command to attach the permissions policy to the role:
For the full detailed walkthrough of these steps, see Getting started with outbound identity federation.
Step 3: Configure trust in the destination account
Create an OIDC identity provider and a trust policy in your Commercial account using the issuer URL from Step 1.
Using the AWS CLI:
- Ensure your IAM principal has permission to call
iam:CreateOpenIDConnectProviderandiam:CreateRole. - Run the following command to register the source account’s issuer URL as an OIDC identity provider in the destination account:
Note:
--thumbprint-listis optional; IAM retrieves the issuer’s certificate thumbprint automatically. Because the AWS STS issuer endpoint uses a certificate from a trusted certificate authority (CA), AWS validates it against its trusted root CAs. - Save the following trust policy to a file named
trust-policy.json. This policy allows the role to be assumed only with tokens matching the expected audience and originating from us-gov-west-1: - Run the following command to create the role with the preceding trust policy:
- Run the following command to attach a permissions policy granting access to the destination S3 bucket:
Step 4: Cross-partition resource access
With the setup complete, your workload requests a JWT from the source partition, exchanges it for temporary credentials in the destination partition, and uses those credentials to access the S3 bucket.
Using the AWS CLI:
- Assume the workload role. In production your workload already runs as this role through its instance profile or execution role, so it skips this step. To trace the flow from the AWS CLI, assume the workload role so the token you create carries that role as its
sub. This command uses jq to parse the JSON: - Create the signed JWT from AWS STS and capture it as a variable:
- Run the following command to exchange the JWT for temporary credentials in the destination partition:
- Export the temporary credentials from the output:
- Run the following command to transfer data from the destination S3 bucket:
For applications, the following AWS SDK for Python example creates a session that handles the token exchange and refreshes the credentials automatically:
Security best practices
We recommend the following best practices for cross-partition access using IAM outbound identity federation.
- Principle of least privilege – Grant only the minimum permissions needed in the destination partition role. Scope to specific resources and actions.
- Use condition keys – In the source account, restrict token audience and duration through IAM policy conditions. In the destination trust policy, use the
audandsubconditions to control which tokens can assume which roles. - Short token lifetimes – Use the shortest practical duration.
- Monitor with CloudTrail – Enable CloudTrail in both accounts. The source
GetWebIdentityTokenevent recordsresponseElements.webIdentityTokenId, and the destinationAssumeRoleWithWebIdentityevent records the same value asrequestParameters.webIdentityTokenIdalongside the source principal ARN and source Region. Matching those two fields correlates access end-to-end across partitions. - Verify compliance – Consult your compliance team to ensure cross-partition data movement meets regulatory requirements.
- Access Path – Access should be initiated from the more restrictive partition to the less restrictive partition.
Controlling cross-partition access by origin
Cross-partition federation is not enabled by default. You enable it at an AWS account level and configure a federation provider. Once enabled, you can control the providers that are allowed to federate in. The condition key aws:FederatedProvider can be used to restrict which federation provider or partitions are allowed, or to deny API calls from credentials federated from a source account or provider. A new condition key introduced with this release, aws:CrossPartitionSourceRegion can be used to deny API calls federated from a source Region.
Allowlist approved origins
To constrain which origins can federate in, apply an RCP on sts:AssumeRoleWithWebIdentity. Because RCPs are deny-only, you express an allowlist as a deny on anything outside your approved set, enforced before any credentials are issued.
Note that sts:AssumeRoleWithWebIdentity is used by all OIDC federation such as GitHub Actions, Amazon EKS, and others, not just cross-partition. Each policy pairs the allowlist with a StringLike that matches any IAM outbound identity federation issuer (*.tokens.sts.*), so the deny applies only to cross-partition federation and leaves your other OIDC providers untouched. The following two examples demonstrate allowing specific issuers or partitions:
- Allowlist trusted issuers. Use
aws:FederatedProviderwithStringNotLikeon the OIDC provider ARN to deny federation from any issuer outside your approved set. - Allowlist a partition. Use
aws:FederatedProviderwithStringNotLikeon the issuer domain to deny federation from any partition you have not approved, without enumerating individual issuer ARNs. Include any cross-partition issuer you want to allow in the policy.
Use policy to control or revoke access after role assumption
Because AWS authorizes requests against the policies in effect, a deny on either key stops in-flight sessions on their next API call. The following examples use an SCP and give you three levers, from one issuer up to an entire partition:
- Deny one issuer. Use
aws:FederatedProviderwithStringEqualson the OIDC provider ARN to deny every API call made with credentials federated from a single source account. - Deny one Region. Use the new
aws:CrossPartitionSourceRegioncondition key to deny every API call made with credentials whose originating JWT was created in a specific source Region. - Deny whole partition. Use
aws:FederatedProviderwithStringLikeon the issuer domain to deny every API call made with credentials federated from an entire source partition, without enumerating OIDC ARNs or Regions.
You can also attach a policy directly to the role in the destination partition to revoke access. For more information, see Deny access to all IAM role sessions associated with a role.
Auditing cross-partition access with CloudTrail
The source partition logs a GetWebIdentityToken event when the JWT is issued, and the destination partition logs an AssumeRoleWithWebIdentity event when the token is exchanged for temporary credentials, both carrying the same JWT ID (webIdentityTokenId). Matching that ID lets you trace and audit a single token from issuance in one partition to its exchange for AWS STS credentials in the other. In the following sample pair of CloudTrail log entries, the cross-partition calls were made from an EC2 instance using its instance role.
Source partition:
webIdentityTokenId: The unique identifier on the source partition that correlates this event to the destinationAssumeRoleWithWebIdentityCloudTrail event.
Destination partition:
sourcePrincipalArn: The IAM principal that obtained the JWT in the source Region.sourceRegion: The Region where the JWT was issued.webIdentityTokenData: The unique identifier on the destination partition that correlates this event to the sourceGetWebIdentityTokenCloudTrail event.
Availability and pricing
Cross-partition IAM outbound identity federation is available in all Regions within the AWS Commercial (aws), China (aws-cn), GovCloud (US) (aws-us-gov), and European Sovereign Cloud (aws-eusc) partitions, at no additional cost. Note that same-partition identity federation isn’t supported with IAM outbound identity federation; for cross-account access within a single partition, use sts:AssumeRole.
Alternative option for cross-partition access
Organizations that already operate a public key infrastructure (PKI) can also use IAM Roles Anywhere to give workloads access across partitions. IAM Roles Anywhere can use your existing certificate authority (CA) or AWS Private Certificate Authority to issue and manage x.509 certificates to specific workloads and applications. To learn more about this alternative, see the blog post Transfer data across AWS partitions with IAM Roles Anywhere.
Conclusion
Cross-partition identity federation gives your workloads a way to reach across AWS partition boundaries without storing or rotating long-term credentials. Short-lived JWTs handle authentication at every stage, and standard IAM roles handle authorization, so the security model is consistent with what you already use inside a single partition. Cross-partition identity federation operates exclusively across AWS partition boundaries. Same-partition federation isn’t supported using IAM outbound identity federation. To learn more, see Federating AWS identities across AWS partitions in the IAM User Guide.
Partitions are isolation boundaries by design with independent IAM instances and separate credentialed access between Regions in different partitions. Treat cross-partition access as an exception and before you establish any, confirm it’s permitted under your regulatory, compliance, and security requirements. For more detail on partitions as a fault isolation boundary, see AWS Fault Isolation Boundaries and Meeting data residency requirements on AWS.