Many teams already run an OpenID Connect (OIDC) identity provider and want their Amazon API Gateway REST APIs to accept its security tokens. Until now, the built-in authorizer for API Gateway REST APIs accepted only Amazon Cognito tokens. For other identity providers, you wrote an AWS Lambda authorizer that downloaded the provider’s signing keys, verified each token, and returned an AWS Identity and Access Management (IAM) policy.
Today, AWS announced JSON Web Token (JWT) authorizers for API Gateway REST APIs, which validate tokens in API Gateway itself. You declare the issuers you trust, the audiences you accept from each, the signing algorithms you permit, and any additional claims you require the token to carry. JWT authorizers work on Regional, edge-optimized, and private REST APIs.
In this post, you learn how JWT authorizers work. You then build a REST API that accepts machine-to-machine tokens from your own identity provider and enforces different scopes on read and write operations. Finally, you add an Amazon Cognito user pool as a second trusted issuer on the same authorizer.
Solution overview
Lambda authorizers remain the right choice when authorization needs custom logic, token introspection, or credentials that are not JWTs. For token validation alone, a JWT authorizer validates the token in API Gateway itself, with no function to maintain and no invocation in the request path, as the following diagram shows.
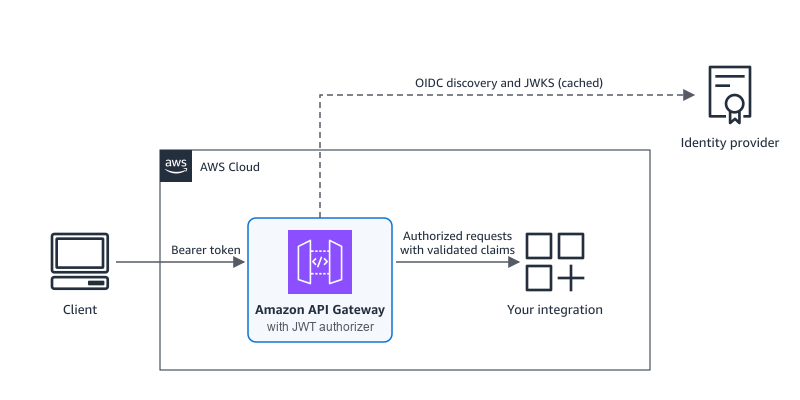
Figure 1: New architecture. API Gateway validates the token inline and forwards only authorized requests to the integration
Each request goes through the following steps:
- The client sends a security token as a bearer token in the header that the identity source names, typically
Authorization. - API Gateway matches the token’s
issclaim to a configured issuer and rejects a token from an unknown issuer before any network call. - API Gateway checks that the token’s signing algorithm is one you configured, then validates the signature against the issuer’s public keys, which it locates through OIDC discovery and caches.
- API Gateway checks the audience and the expiry and not-before times.
- If the method requires authorization scopes, you must use an access token that carries at least one of them in its
scopeorscpclaim. - API Gateway checks any additional claim rules you configured for that issuer.
- API Gateway passes the validated claims to the integration, and the request proceeds.
API Gateway stops processing the request at the first failed check. API Gateway returns 401 Unauthorized for a missing, malformed, expired, or untrusted token. It returns 403 Forbidden for a valid token that lacks a required scope or fails a claim rule. If API Gateway cannot reach an issuer’s key endpoint and has no cached keys, it returns a 5xx response rather than letting the request through.
Walkthrough
In this walkthrough, you create an orders REST API in which GET /orders requires the orders:read scope and POST /orders requires orders:write.
Prerequisites
To follow this walkthrough, you need:
- An AWS account and an IAM principal with permissions to manage API Gateway resources, and Amazon Cognito resources for step 7. Follow the principle of least privilege.
- An OIDC-compatible identity provider that supports the OAuth 2.0 client credentials flow and publishes a discovery document at
/.well-known/openid-configuration. - The latest version of the AWS Command Line Interface (AWS CLI).
curlandjq.
Step 1: Prepare your identity provider
In your identity provider, create an API (or resource server) for the orders service with two scopes, orders:read and orders:write. Then create two machine-to-machine applications: a reporting application with only orders:read and a fulfillment application with both scopes.
Then collect the following values, shown here for three common providers.
| Value | Okta | Auth0 | Microsoft Entra ID |
ISSUER | https://{yourOktaDomain}/oauth2/default for the default custom authorization server | https://{yourTenant}.auth0.com/, including the trailing slash. Note that URL might include country code. | https://login.microsoftonline.com/{tenantId}/v2.0 |
AUDIENCE | The authorization server’s Audience, for example api://default | The API Identifier | The application ID URI or client ID of the API app registration |
TOKEN_URL | {ISSUER}/v1/token | https://{yourTenant}.auth0.com/oauth/token Note that URL might include country code. | https://login.microsoftonline.com/{tenantId}/oauth2/v2.0/token |
| Scopes | Custom scopes on the authorization server | Permissions on the API, granted to each application | See Considerations. Client credentials tokens carry app roles, not scopes. |
For the example walkthrough, set the values as environment variables (production clients can load client secrets from AWS Secrets Manager or an equivalent store).
The issuer must match the token’s iss claim exactly, including any trailing slash, so copy it from a decoded token.
Step 2: Create the JWT authorizer
Create a REST API, then describe the authorizer in a file that lists the trusted issuers, the audiences accepted from each, and the signing algorithms you configure on your issuer:
When you create or update the authorizer, API Gateway reads each issuer’s discovery document and checks that its issuer value matches. If your provider signs with an elliptic curve key, add ES256 or another supported algorithm to defaultAlgorithms. Keep jwt-config.json for step 7.
Step 3: Attach the authorizer to methods with different scopes
Create the /orders resource and two methods that share the authorizer but require different scopes. A mock integration returns the issuer and subject from the validated token:
Step 4: Deploy the API
Deploy the API to a stage named test and record the invoke URL:
Step 5: Test the failure cases first
Call the API without a token:
The request returns 401, because API Gateway rejects it before the integration runs.
Next, use a token for the reporting application, which has only orders:read, to create an order. The get_token helper sends an OAuth 2.0 client credentials request:
The request returns 403. The token is valid, but POST /orders requires orders:write.
Step 6: Test the successful cases
Read orders with the reporting token, then request a token for the fulfillment application and create an order:
Both calls return 200 with the issuer and subject that the integration received:
Step 7: Add Amazon Cognito as a second issuer
An authorizer can trust up to 10 issuers, for example while you migrate between identity providers. In this step, you add a Cognito user pool to the same authorizer.
Create a user pool, a domain for its token endpoint, a resource server with the two scopes, and one machine-to-machine client:
Add the user pool to jwt-config.json and send the full file back, because an update replaces the whole configuration. Cognito access tokens carry the app client ID in client_id rather than aud, so use the client ID as the audience:
The following screenshot shows the updated authorizer in the API Gateway console, with the key set that API Gateway resolved for each issuer.
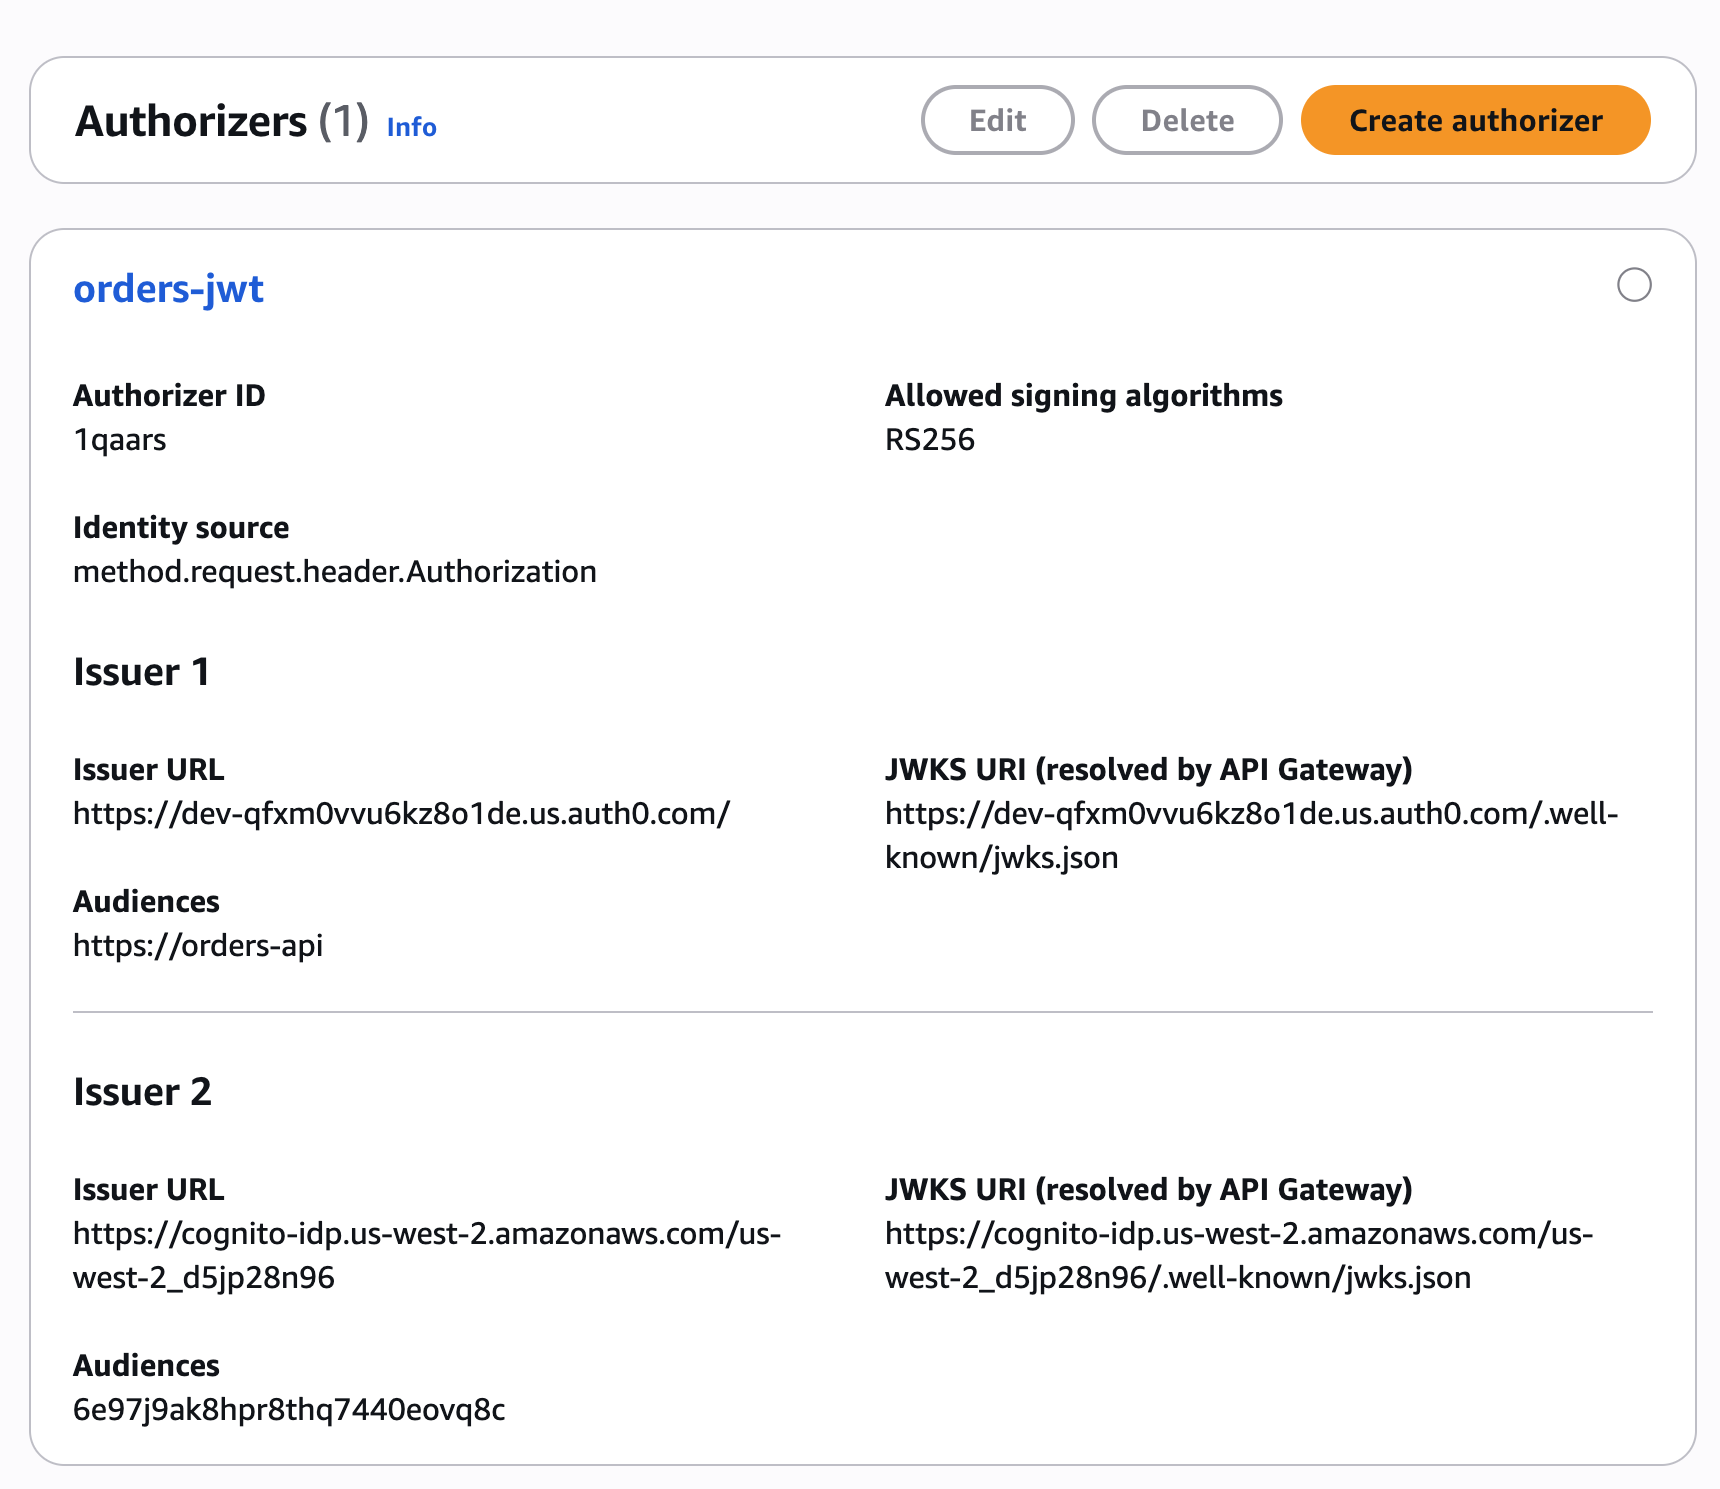
Figure 2: JWT authorizer with two trusted issuers
If you no longer have the jwt-config.json file, rebuild it from get-authorizer and remove the jwksUri fields, because API Gateway rejects an update that includes them:
Cognito names scopes {resource server}/{scope}, so its token carries orders/orders:read rather than orders:read. Add that form to GET /orders, then redeploy, because authorizer and method changes take effect only in a new deployment:
The request returns 200 with the Cognito issuer, and tokens from your original provider keep working. For Cognito issuers, a method with scopes accepts only access tokens and a method without scopes accepts only ID tokens. Give each method that client credentials callers use at least one scope.
To finish a migration, remove the retired issuer from jwt-config.json, send the same replace operation (using aws apigateway update-authorizer --patch-operations command), and redeploy.
Optional: Require an additional claim
To accept only tokens whose department claim equals eng, add a claim rule to the issuer entry. Matching is exact and case-sensitive, and API Gateway returns a 403 for other tokens:
Defining JWT authorizers as infrastructure as code
In AWS CloudFormation, the AWS::ApiGateway::Authorizer resource has a JwtConfiguration property that mirrors the API, and methods set AuthorizationType: JWT and AuthorizationScopes:
In OpenAPI 3.0 and Swagger 2.0 definitions, use the x-amazon-apigateway-authorizer extension with type: jwt:
You can also convert an existing Lambda or Cognito authorizer in place with one update-authorizer command that changes /type, replaces /jwtConfiguration, and clears the old type’s fields. Clear Lambda fields with a replace that has no value, and remove each Cognito provider ARN with remove. Then switch each method that uses the authorizer to authorizationType: JWT, add its scopes, and redeploy.
Using claims in your integration
API Gateway passes every JWT claim to your backend as JSON as it appeared in the token. Strings stay quoted and escaped, numbers stay numbers, and arrays and objects stay intact, so your backend never has to guess what was sent. Mapping templates read validated claims as $context.authorizer.claims.name, as with Cognito authorizers, and Lambda proxy integrations receive them in event.requestContext.authorizer.claims.
HTTP proxy integrations don’t forward claims automatically, so map the ones you need to headers, for example integration.request.header.x-caller to context.authorizer.claims.sub.
Observability and troubleshooting
When API Gateway rejects a request, the response body is Unauthorized or The incoming token has expired for a 401, and Access Denied for a 403. A WWW-Authenticate header that follows RFC 6750 carries the details, such as the failed check or, for a missing scope, the scopes the method accepts.
With execution logging on, API Gateway logs a claims summary for each request, without the raw token. Data trace logging masks the Authorization header but not custom headers, so if your identity source is a header such as X-Token, keep data trace logging off for that stage.
To test an authorizer before you deploy, choose Test authorizer on the authorizer page or run test-invoke-authorizer. The test skips method scopes and accepts Cognito identity tokens, so call the deployed method to test scopes.
Considerations
Before you add a JWT authorizer, consider the following:
- An authorizer trusts 1–10 issuers. Each issuer accepts 1–100 audiences and up to 10 additional claim rules, each with at most one expected value.
- Supported signing algorithms are RS256, RS384, RS512, ES256, ES384, and ES512, and API Gateway rejects HMAC and
alg: nonetokens. The token header must carry akid, which some providers omit by default. - API Gateway allows 60 seconds of clock skew when it checks
exp,nbf, andiat. - API Gateway caches each issuer’s signing keys for about 60 minutes, so a key your provider removes can still verify tokens for that long. If the key endpoint is unavailable, API Gateway keeps using the last key set for up to 1 hour.
- A token passes a method’s scope check when its
scopeorscpclaim carries one of the method’s scopes. Microsoft Entra ID client credentials tokens carry permissions inrolesinstead, so use a dedicated audience per caller or a Lambda authorizer for role checks. - An authorizer reads the token from a single request header.
- JWT authorizers don’t check revocation, so a token stays valid until it expires. Use short token lifetimes for sensitive operations.
- The issuer URL must be publicly accessible.
Clean up
To avoid incurring future charges, delete the resources you created:
In your identity provider, delete the two applications and the orders API or resource server if you no longer need them.
Conclusion
With JWT authorizers, you can validate tokens from OIDC-compatible identity providers in API Gateway REST APIs without a function in the request path. In this post, you built an API that accepted machine-to-machine tokens from your own provider, enforced separate read and write scopes, and added a Cognito user pool as a second issuer. Lambda authorizers remain the right tool for custom authorization logic. For token validation alone, we recommend the JWT authorizer.
JWT authorizers for REST APIs are available in all commercial AWS Regions, the AWS GovCloud (US) Regions, and the China Regions. To get started, refer to Controlling access to a REST API using JWT authorizers in the Amazon API Gateway Developer Guide. To learn more about serverless architectures, visit Serverless Land.


