Running QUIC workloads with mutual TLS (mTLS) at scale is a challenge for organizations operating autonomous vehicle fleets or industrial Internet of Things (IoT) workloads on AWS. These devices need both low-latency communication and mutual device authentication. These workloads operate in cellular networks where devices undergo handoffs between cell towers mid-operation but still need to maintain connection stability and rapid data transfer. QUIC (RFC 9000) is a UDP-based transport protocol with built-in TLS 1.3 encryption and session stickiness that offers ultra-low-latency communications.
With AWS Network Load Balancer QUIC passthrough mode, you can forward QUIC traffic to backend targets while maintaining session stickiness using Connection IDs. This post highlights the use case of Zipline, which operates fleets of drones and needed to build scalable QUIC-enabled communications workloads with mTLS security requirements. The post shows how to achieve this by configuring your environment to route traffic from remote device clients to QUIC server pods running on Amazon Elastic Kubernetes Service (Amazon EKS) through the AWS Load Balancer Controller.
Customer use case: Zipline
Zipline, an American drone delivery company, has flown nearly 150 million miles delivering medical supplies and packages with its autonomous drones, and makes a delivery somewhere in the world every 15 seconds. AWS supports Zipline’s infrastructure. Each drone is a mobile client streaming telemetry, position, and mission data to backend services in real time. It flies across cellular networks, handing off between cell towers as it flies. Across a fleet running continuously on multiple continents, connection stability and per-device trust become first-order requirements, not edge cases.
With TCP, a tower handoff or IP change forces a reconnect and TLS renegotiation, adding latency to fleet communications. Shared-secret authentication schemes don’t help either: managing a unique secret per device across thousands of drones would be operationally heavy and fleet-wide shared credentials present a risk.
QUIC solves the transport side, using its Connection ID to keep a session alive through mid-flight handoffs without a costly reconnect. Mutual TLS solves the trust side: operators get cryptographic device identity and can revoke one compromised device without rotating fleet-wide credentials. The rest of this post shows how to build a reference implementation of this pattern on Amazon EKS: mTLS over QUIC, terminated on your own backends behind a Network Load Balancer in passthrough mode.
Background
This section explains how QUIC runs on Network Load Balancer in passthrough mode and why mutual TLS matters for fleet workloads.
QUIC on NLB: Passthrough mode
In passthrough mode, the Network Load Balancer forwards QUIC packets directly to backend targets. These sessions use TLS for encryption in transit and terminate the TLS session on the backend targets.
- End-to-end encryption – The Network Load Balancer doesn’t see plaintext traffic. The application controls the full TLS handshake, including client certificate verification.
- Connection ID routing – The Network Load Balancer routes packets by reading an encoded Server ID from the QUIC Connection ID. Sessions persist across client IP changes.
The need for mTLS
In standard TLS, only the server presents a certificate. In mutual TLS, the client also presents a certificate verified against a trusted Certificate Authority (CA). For fleet workloads, mTLS provides:
- Device identity – Each device cryptographically proves its identity on every connection, thwarting threats of rogue device injection.
- Certificate-based access control – An affected device’s certificate can be revoked without rotating shared secrets.
- Regulatory alignment – Regulations might require mutual authentication for connected devices.
Architecture
Figure 1 shows an architecture of the workload inside a virtual private cloud (VPC) configured for mTLS over QUIC using the AWS Load Balancer Controller (LBC) and has Amazon EKS with quic-go as the QUIC server. With this approach, Kubernetes manages the QUIC-enabled Network Load Balancer declaratively. You can run mTLS-authenticated QUIC workloads on EKS with a familiar Kubernetes workflow: The LBC provisions the Network Load Balancer and target group and wires up Server ID injection for you.
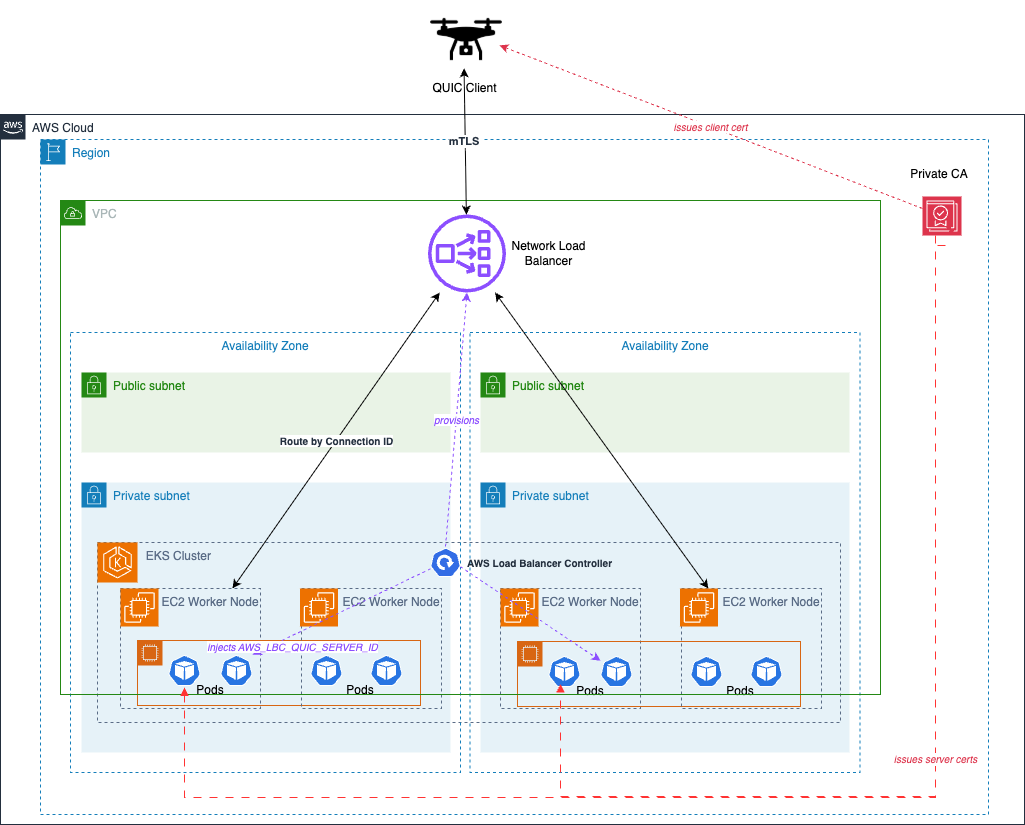
Figure 1: End-to-end mTLS over QUIC with a Network Load Balancer in passthrough mode. A QUIC-enabled Network Load Balancer, provisioned by the AWS Load Balancer Controller, routes traffic by Connection ID (Server ID) to quic-go server pods on Amazon EKS. AWS Private CA issues certificates to the QUIC client (drone fleet) and server pods (on EKS)
In this architecture, the Network Load Balancer operates at the packet level and doesn’t terminate TLS. Because the Network Load Balancer passes the QUIC handshake through unmodified, your quic-go server (running as a pod on EKS) handles the full mTLS exchange, including client certificate verification. The following sections explain the steps to create this setup. These steps use quic-go, but the same approach applies to any QUIC server where you can configure the TLS settings and Connection ID format described in the Connection ID requirements for mTLS in the Considerations section.
Prerequisites
Before you start, make sure that you have:
- An AWS account with permission to create Amazon Elastic Kubernetes Service (Amazon EKS) clusters, AWS Identity and Access Management (IAM) roles and policies, Amazon VPCs, Network Load Balancers, Amazon Elastic Container Registry (Amazon ECR) repositories, and AWS Private CAs.
- The AWS Command Line Interface (AWS CLI) installed and configured on your local machine.
- eksctl, kubectl, Helm, and Go (1.24 or later) installed. A container build tool such as Finch, Docker, or Podman.
- Cloned the sample source code repository.
Walkthrough
Before adding mTLS, we build the underlying QUIC passthrough path with server-only TLS and verify it end-to-end. The LBC provisions the Network Load Balancer and target group and injects a unique Server ID into each pod through the AWS_LBC_QUIC_SERVER_ID environment variable. The Network Load Balancer uses this for Connection ID routing to meet the QUIC-specific requirements and considerations. For more details, see the LBC QUIC Guide. For background on Network Load Balancer QUIC passthrough, see Introducing QUIC Protocol Support for NLB.
This guide walks through deploying a QUIC server behind an AWS Network Load Balancer on EKS with mutual TLS. It spans eight steps: creating an EKS cluster, installing the AWS Load Balancer Controller, enabling Server ID injection, provisioning TLS certificates through AWS Private CA, deploying the QUIC server, provisioning a QUIC-enabled Network Load Balancer, verifying server-only TLS, and finally enabling and testing mTLS.
Step 1: Create an Amazon EKS cluster
The scripts/cluster.yaml file in the repository defines a standard two-node managed node group with an IAM OpenID Connect (OIDC) provider enabled. This provider is required for IAM roles for service accounts (IRSA), which the LBC uses.
Run in your terminal:
The EKS cluster with the nodes created is shown in Figure 2.
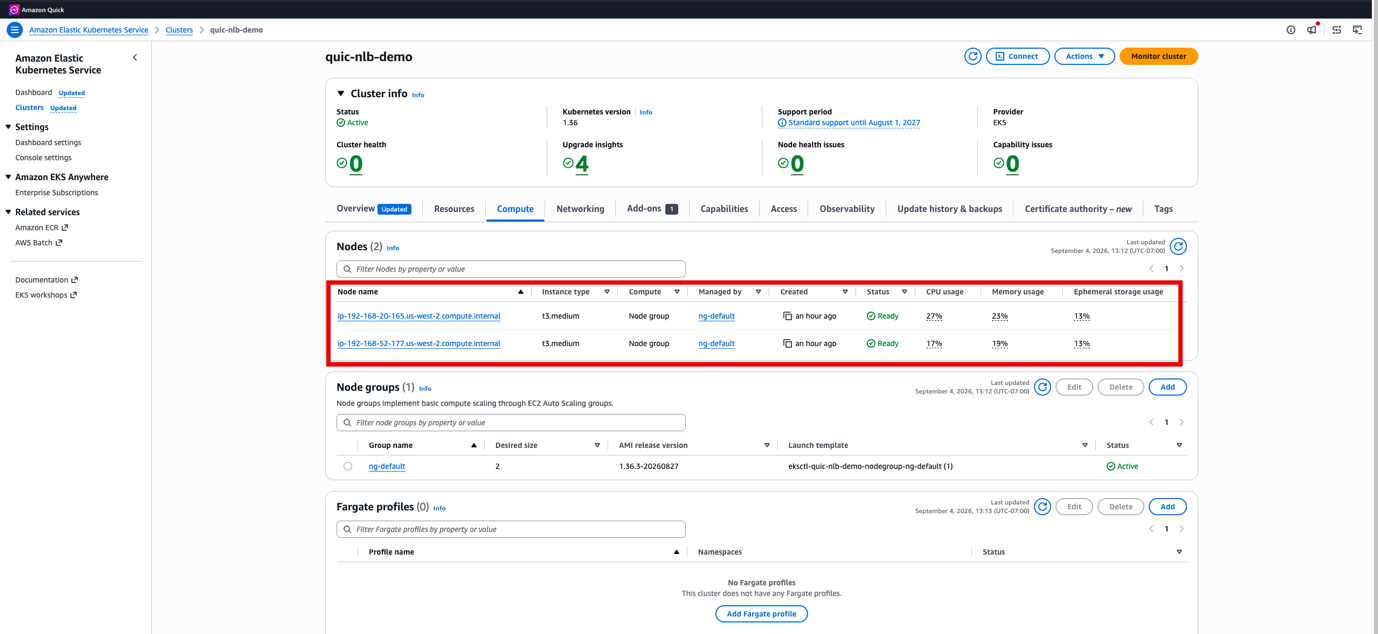
Figure 2: Active clusters on the EKS console with cluster info
Step 2: Install the AWS Load Balancer Controller
The scripts/install-lbc.sh script performs three actions:
- Creates the IAM policy from the controller’s upstream policy document.
- Creates an IRSA-backed service account.
- Installs the chart with Helm.
Run in your terminal:
After the rollout, you see two aws-load-balancer-controller-* pods Running alongside the standard EKS add-ons (aws-node, coredns, kube-proxy, metrics-server), as shown in Figure 3.
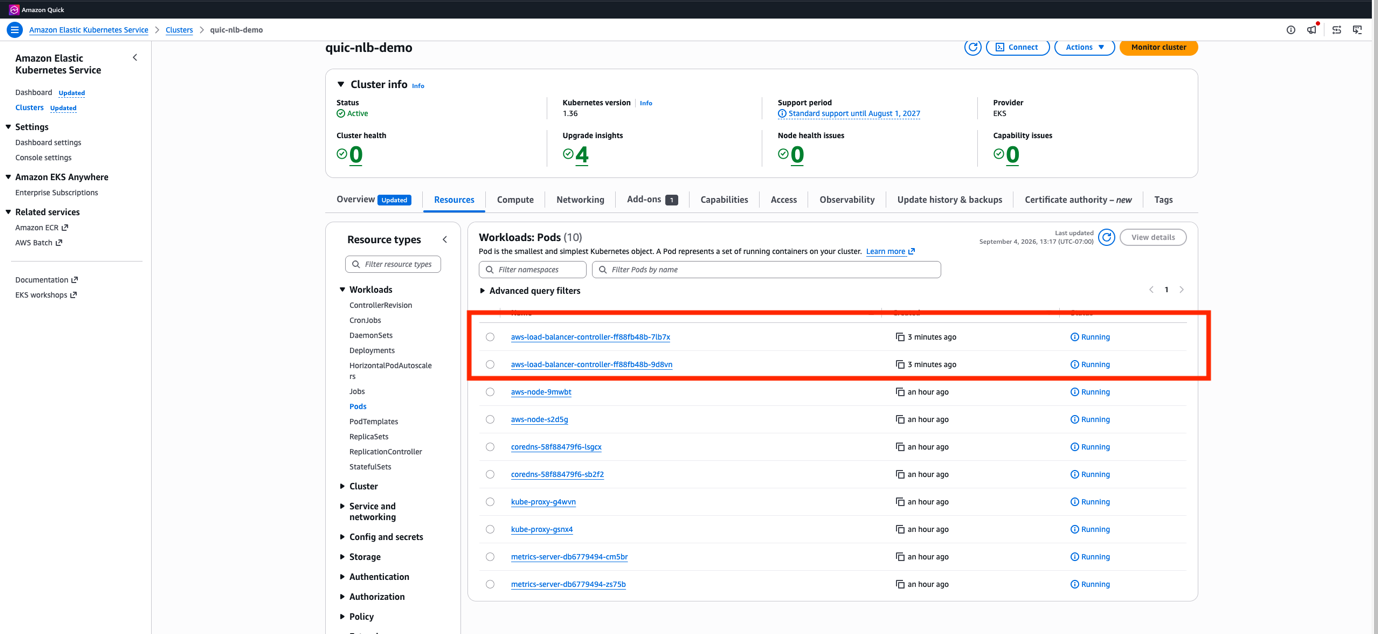
Figure 3: Active LBC pods on the EKS console
Step 3: Enable Server ID injection on the application namespace
Server ID injection requires two opt-ins. The first is a namespace label (elbv2.k8s.aws/quic-server-id-inject: enabled) that activates injection across the namespace. The second is a pod annotation (service.beta.kubernetes.io/aws-load-balancer-quic-enabled-containers: <container-name>) on each pod that tells the LBC which container receives the AWS_LBC_QUIC_SERVER_ID environment variable. Both must be present. The repository ships manifests/00-namespace.yaml with the required label.
From manifests/00-namespace.yaml:
Run in your terminal:
Confirm the label is on the namespace before continuing. Step 5 depends on it. The LABELS column must include elbv2.k8s.aws/quic-server-id-inject=enabled.
Run in your terminal:
Expected output:
Step 4: Prepare the TLS material
We use AWS Private Certificate Authority (AWS Private CA) for the device fleet’s certificate management. Running scripts/gen-certs.sh provisions a general-purpose AWS Private CA, issues a server certificate (CN=quic-example.local) and a client certificate (CN=drone-001) from it, and saves the CA ARN to certs/ca.arn for teardown. Load the outputs into a Kubernetes Secret in the quic-example namespace so the QUIC server can mount its TLS certificate, private key, and the device fleet CA certificate.
Run in your terminal:
Confirm that the three keys are present.
Run in your terminal:
Expected output:
Step 5: Deploy the QUIC server
The container image must run a QUIC server that:
- Reads the base64-encoded
AWS_LBC_QUIC_SERVER_IDenvironment variable and places the decoded 8 bytes at bytes 1–8 of every Connection ID it emits (see Connection ID requirements for mTLS in the Considerations section). - Also accepts TCP on the same port. Network Load Balancer target groups default to TCP health checks, so a UDP-only server stays unhealthy. A stub TCP listener that accepts and closes is enough. This is implemented in our
server/main.goapplication code.
Run in your terminal:
Apply the baseline deployment. The IMAGE_PLACEHOLDER token is replaced by sed at apply time.
Run in your terminal:
Confirm each pod received a Server ID.
Run in your terminal:
Expected output (values differ per pod):
Each is a base64-encoded 8-byte Server ID the server places at bytes 1–8 of every Connection ID.
Step 6: Provision the QUIC-enabled NLB
Apply the Service defined in manifests/20-service-quic.yaml. The Service uses loadBalancerClass: service.k8s.aws/nlb and the following six annotations. Together they instruct the LBC to create a TCP_QUIC listener on port 443: QUIC traffic on UDP alongside a TCP endpoint on the same port for the Network Load Balancer health checks.
From manifests/20-service-quic.yaml:
The aws-load-balancer-disable-nlb-sg: "true" annotation disables Network Load Balancer security groups. The aws-load-balancer-enable-tcp-udp-listener: "true" and aws-load-balancer-quic-enabled-ports: "443" annotations combine UDP and TCP on port 443 into one listener and upgrade the path to TCP_QUIC.
Run in your terminal:
The DNS name looks like quic-nlb-demo-.elb.us-west-2.amazonaws.com after the controller finishes reconciling, as shown in Figure 4.
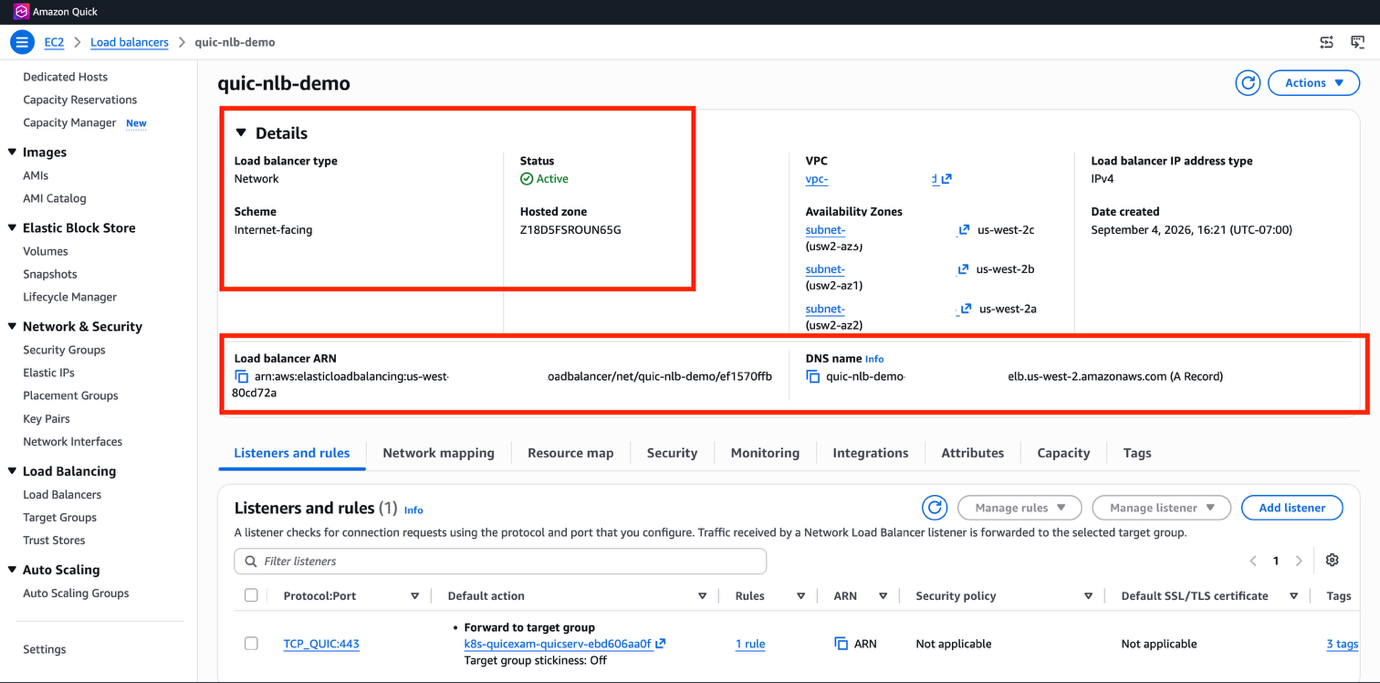
Figure 4: The provisioned Network Load Balancer on the EC2 console showing Type=network, Scheme=internet-facing, and State=Active
You can also see the Server ID of each pod of the EKS cluster in the target details of the target group, as shown in Figure 5.
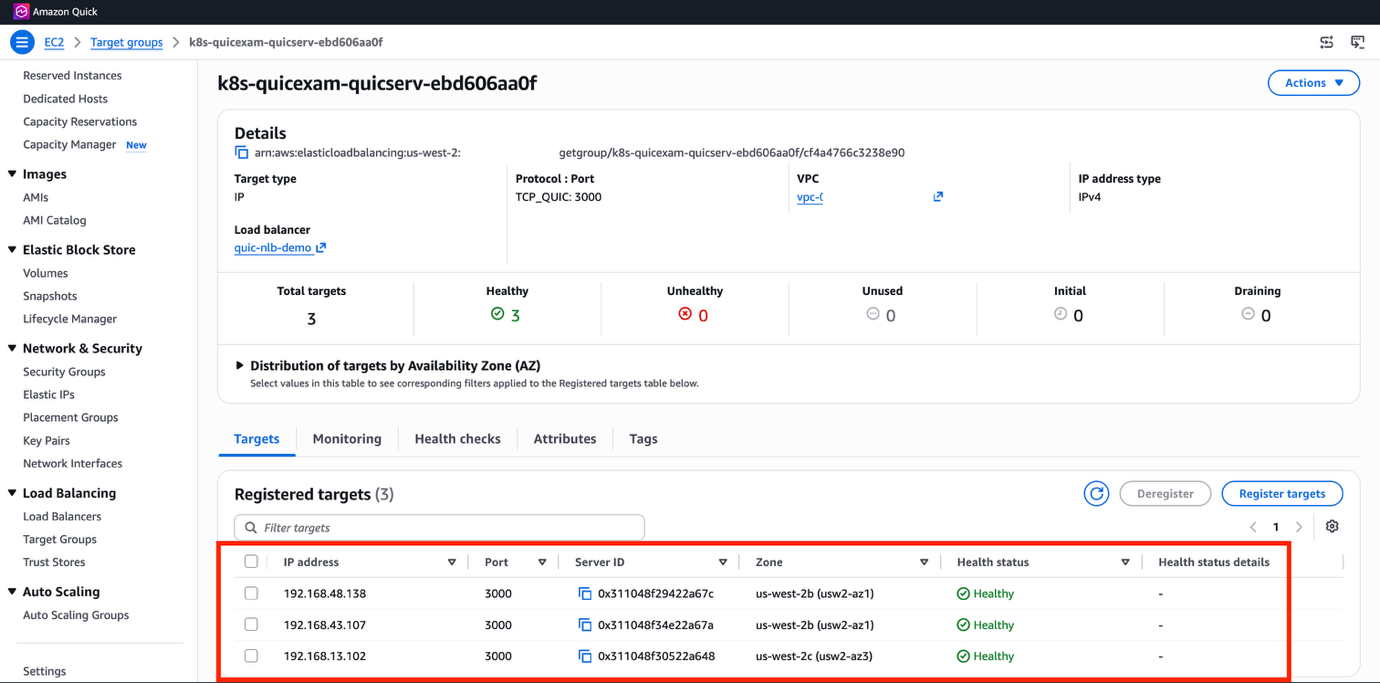
Figure 5: The target group’s Targets tab showing three healthy pod IPs, each with its assigned Server ID.
Step 7: Verify server-only TLS end-to-end
Before enabling mTLS, connect with server-only TLS to confirm the base path works. Build the client and connect to the Network Load Balancer with no client certificate. The client runs on your local machine and connects to the internet-facing Network Load Balancer over the public internet.
Run in your terminal:
Connect to the Network Load Balancer with no client certificate (baseline mode, because mTLS isn’t enabled yet).
Run in your terminal:
Expected output:
After server-only TLS connections complete successfully through the Network Load Balancer, proceed with the following mTLS-specific configuration.
Step 8: Add mTLS to your QUIC server
Because the Network Load Balancer passes the QUIC handshake through without modification, the server enforces mTLS. In quic-go, the listener accepts a standard Go crypto/tls.Config. Three fields make it mTLS-specific:
ClientAuth: RequireAndVerifyClientCert– Request and validate a client certificate. Reject the handshake if it fails.ClientCAs: anx509.CertPoolloaded with your AWS Private CA. Client certificates are verified against this pool.MinVersion: tls.VersionTLS13(QUIC requires TLS 1.3).
Apply the mTLS-enabled deployment
The repository ships a second manifest, manifests/30-deployment-mtls.yaml, that is identical to the baseline deployment except it sets MTLS_ENABLED=true on the server container. The server reads this variable and switches its crypto/tls.Config to ClientAuth: RequireAndVerifyClientCert. Apply it as a rolling update to the same deployment you created in Step 5.
Run in your terminal:
Confirm the server pods restarted in mTLS mode.
Run in your terminal:
Expected output (one line per pod):
Test the mTLS handshake
A connection with a valid client certificate should succeed. A connection with no client certificate or with a certificate not signed by the trusted CA should fail during the QUIC handshake with a certificate required (TLS alert 116) error on the client, and no data reaches the server’s application layer.
Run in your terminal – Case 1: valid client certificate (should succeed):
Run in your terminal – Case 2: no client certificate (should fail with tls: certificate required):
Run in your terminal – Case 3: untrusted client certificate (same failure):
Server-side, the successful case should log the verified peer certificate.
Run in your terminal:
Expected output (for Case 1 only):
Observability
In your server, log the negotiated TLS version, observed destination connection ID (DCID) length, and the peer certificate subject on every accepted connection. Under steady traffic, the Network Load Balancer NewFlowCount_QUIC and ProcessedBytes_QUIC metrics should track those log entries. On the Amazon CloudWatch console, choose Metrics, All metrics, AWS/NetworkELB, Per LB Metrics and filter to your Network Load Balancer with quic-nlb-demo to graph both.
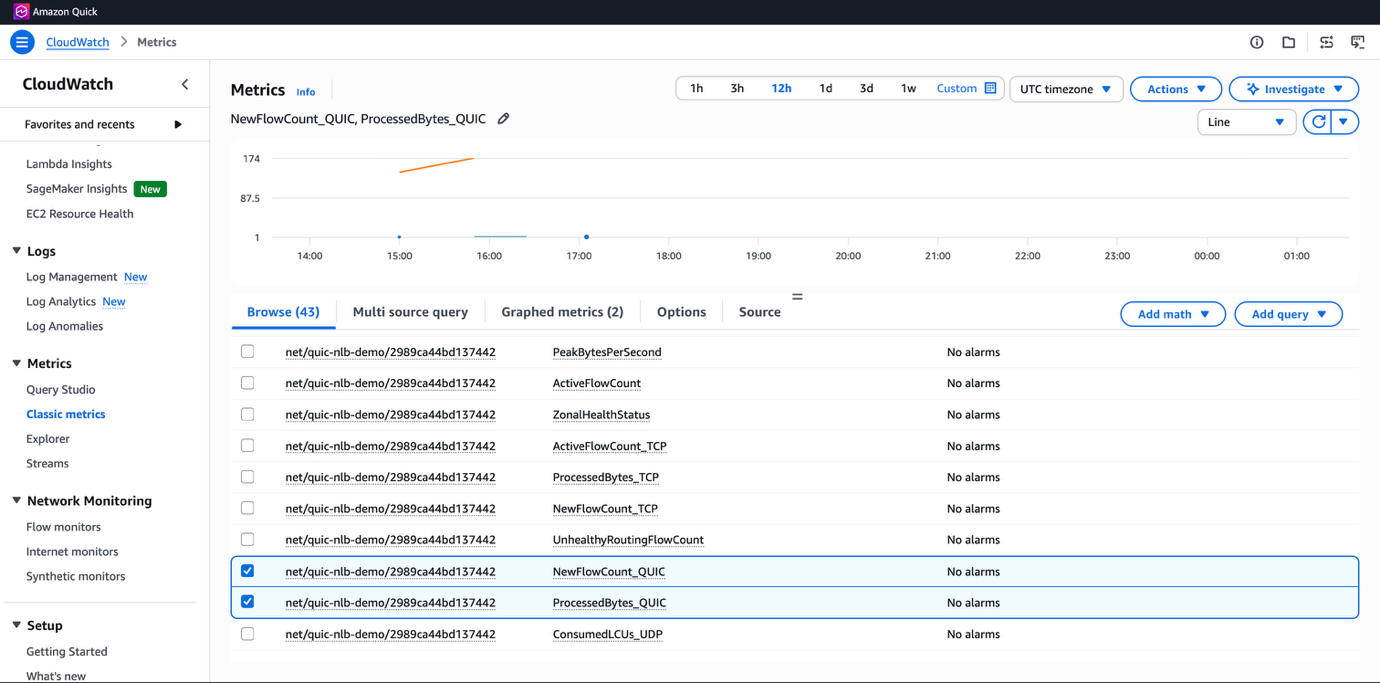
Figure 6: Amazon CloudWatch metrics showing QUIC metrics
The reference repository README covers deeper inspection: comparing pod-side Server IDs against the controller’s target-registration log, reading per-connection server logs, querying Amazon CloudWatch from the CLI, and wire-level packet-capture verification of the 17-byte DCID layout.
Considerations
- Connection ID requirements for mTLS: The Network Load Balancer extracts the Server ID from a fixed 17-byte DCID layout defined in the QUIC-LB specification: Byte 0 is the config rotation ID, bytes 1–8 are the Server ID, and bytes 9–16 are a random nonce.Non-Envoy QUIC servers must use a full 8-byte nonce to produce the required 17-byte DCID. Envoy uses 7 bytes (appending a 1-byte worker ID), but that 7-byte nonce on a non-Envoy server yields a 16-byte DCID. The Network Load Balancer drops non-Initial long-header packets (Handshake, 0-RTT, Retry) whose DCID isn’t exactly 17 bytes. With server-only TLS, this goes unnoticed because the client’s small Finished message coalesces (RFC 9000 §12.2) into the Initial-led datagram, which is exempt. With mTLS, the client’s certificate chain spills into standalone Handshake datagrams that trigger the length check. If the DCID is not exactly 17 bytes, the handshake stalls silently.
- Server IDs must be unique across all registered targets: Different pods must use different Server IDs. The LBC handles this automatically for IP targets, but if you’re managing target registration yourself (for example, across multiple clusters or Network Load Balancers sharing a target group), you must verify that there are no collisions. A duplicate causes the Network Load Balancer to route traffic unpredictably between both targets.
- Server ID reuse during rolling deployments: When a pod is replaced (rolling update, node drain, spot reclaim), the old Server ID is deregistered and a new one assigned. In-flight QUIC connections using the old Server ID will break. Clients see a drop and must reconnect. Your client should implement QUIC connection migration or fast reconnect logic to handle this gracefully.
- QUIC-LB is still an Internet Engineering Task Force (IETF) draft: The AWS implementation tracks the current IETF draft, which has been stable, but the spec might change before it becomes an RFC. Monitor the QUIC-LB draft for updates that might require changes to your Connection ID generator.
- Network Load Balancer does not drain QUIC connections: When a target deregisters, packets carrying its Server ID are dropped. Use a Kubernetes preStop hook to send
CONNECTION_CLOSEbefore termination, and design clients for fast reconnect. - Network Load Balancer health checks are TCP, not QUIC: If the TCP shim hangs while the QUIC stack is healthy (or vice versa), the Network Load Balancer view diverges from reality. Consider application-level health signaling.
Cleaning up
Delete resources deployed in this setup after you finish testing so that you don’t continue to incur costs.
Run in your terminal:
Verify nothing is left behind. None of the following commands should return any resources named quic-nlb-demo.
Run in your terminal:
Conclusion
QUIC passthrough on Network Load Balancer gives mobile and lossy-network clients session continuity across IP changes, and mutual authentication that never leaves the pod. Fleets of autonomous vehicles, drones, or industrial IoT devices authenticate directly to your application. The Network Load Balancer passes the TLS handshake through unmodified. The load balancer’s job is to steer packets by Connection ID and help scale traffic handling.
Get started with implementation using this sample repository. Read more about QUIC protocol support for Network Load Balancer.


